In this video, I’m putting an app on AppSource. Going through all (well most) of the steps. Follow along as I try to get the openrates.io integration packaged up for AppSource and watch me try to fill out all the information required to submit an app.
(I’m sorry for my frozen head halfway through, my HDMI grabber is acting up)

Well, I did make a mistake, having a single letter being lowercase in app.json and uppercase somewhere else, so 10 seconds after the video ended, I got this error:
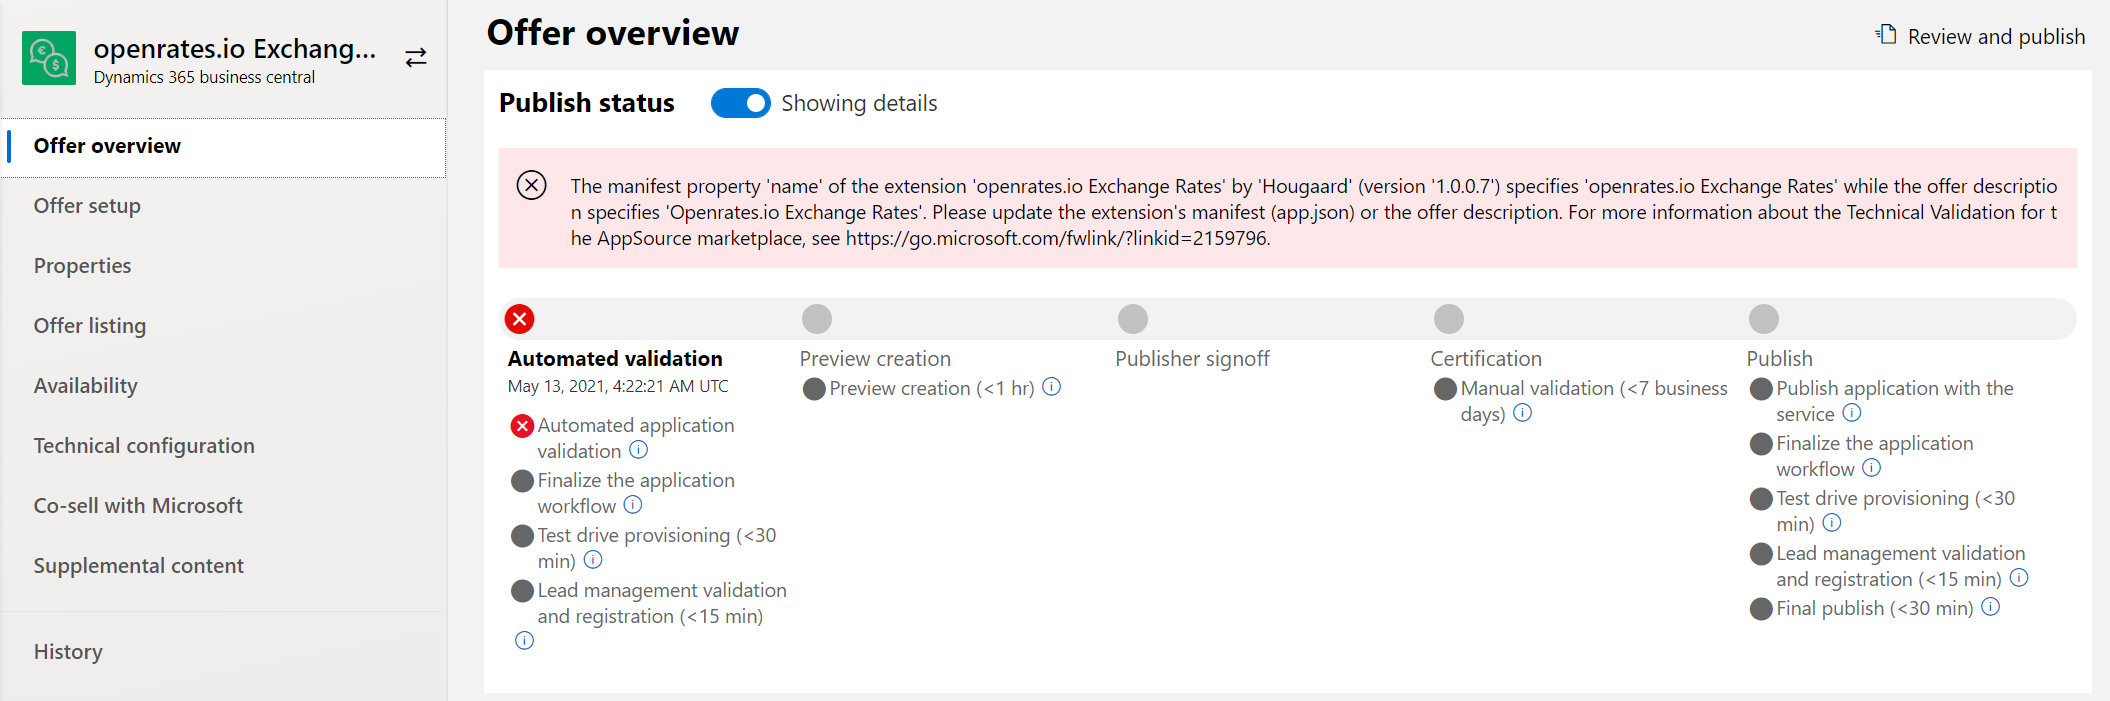
So in part #2 I’m fixing my mistake 🙂
A couple of minutes after finishing part #2, the app completed the first sted, and I clicked Go Live – So now starts the manual validation, I’ll create part #3 with an update after Microsoft has completed the validation.

In this first part of the series, Erik walks through the entire process of preparing and submitting a Business Central extension to Microsoft AppSource. Starting from a simple app that fetches exchange rates from openrates.io, he covers everything from code cleanup and compliance requirements to filling out every field in the Partner Center submission form. This is a practical, real-time walkthrough — complete with the inevitable hiccups that come with live recording.
Starting Point: The App
The app in question is a small Business Central extension that retrieves exchange rates from openrates.io. Erik originally built this in a previous video as a single page extension, but for the AppSource submission, he cleaned it up significantly:
- Extracted the core logic (
GetRateForDate) into a dedicated codeunit - Converted all error messages to labels so they can be translated
- Made the codeunit runnable directly, so it can be used in a Job Queue
- Assigned object numbers from his reserved AppSource number range (much higher than typical development ranges)
- Added a postfix (
HDD— for “Hougaard”) to all object names to avoid naming collisions in the global namespace
Code Analysis and AppSource Cop
A critical step before submission is enabling the right code analyzers. Erik activated three analyzers in his project:
- CodeCop — General AL code analysis
- UICop — Ensures UI elements have tooltips, images on actions, and other UI best practices
- AppSourceCop — Validates AppSource-specific requirements like correct object number ranges, required affixes, and restricted patterns
Combined with the "target": "Cloud" setting in app.json, the AppSourceCop catches many issues that would otherwise cause rejection during Microsoft’s review.
The app.json Configuration
Here’s a reference app.json for an AppSource-targeted extension:
{
  "id": "f133753d-6890-41f8-8556-de7e3ccb282a",
  "name": "Better AppSource Page",
  "publisher": "hougaard",
  "version": "1.0.0.0",
  "brief": "",
  "description": "",
  "privacyStatement": "",
  "EULA": "",
  "help": "",
  "url": "",
  "logo": "",
  "dependencies": [],
  "screenshots": [],
  "platform": "1.0.0.0",
  "application": "25.0.0.0",
  "idRanges": [
    {
      "from": 56100,
      "to": 56149
    }
  ],
  "resourceExposurePolicy": {
    "allowDebugging": true,
    "allowDownloadingSource": true,
    "includeSourceInSymbolFile": true
  },
  "runtime": "14.0",
  "features": [
    "NoImplicitWith"
  ]
}
Key points to note: the idRanges must come from your Microsoft-reserved range, and the name, publisher, and version values must match exactly what you enter in the Partner Center offer.
The Build Process
Erik has built his own build pipeline (running locally for this demo, but normally on a server). The build process follows these steps:
- Increment the version number — Each build gets a new build number automatically
- First compile — Generates the translation file (XLIFF)
- Auto-translate — A custom tool matches label text against Microsoft’s own base app translations across all languages. If no match is found, it falls back to Azure Cognitive Services for machine translation. Hand-translated strings can also be added to a cache
- Second compile — Recompiles with the completed translation files included
- Code sign — The app file must be digitally signed before it can be uploaded to AppSource
- Git operations — Version tagging and commits
Microsoft’s Technical Validation Checklist
Before submitting, Erik runs through Microsoft’s technical validation checklist. Here’s a summary of the key items and how they were addressed:
- AppSource.json mandatory properties — Name, publisher, and version must match the offer settings
- Remote services — HTTP calls must use the AL
HttpClienttype (no .NET interop) - Digital signing — The app file must be signed with a valid certificate
- User scenario document — A Word/PDF document describing setup steps and validation tests
- Application areas — The AppSourceCop validates that all controls have proper application areas
- Permission sets — Must generate a permission set containing the extension’s objects (Erik caught this one mid-checklist and rebuilt)
- Publish/sync/install testing — Verify the full lifecycle: publish, sync, install, uninstall, reinstall
- No OnBeforeCompanyOpen or OnAfterCompanyOpen — These events are restricted for AppSource apps
- Affixes — All objects must use a registered prefix or suffix
- Data classification — Required for any tables or table extensions (not applicable for this app)
- Use AddFirst or AddLast — When placing actions on Business Central pages, always use
addlastoraddfirstrather thanaddafteroraddbefore, because group anchors are more stable than specific action anchors - No runtime packages — You must submit source-compiled app files
- Translation files — Required for multi-language support
Submitting Through Partner Center
To submit an app to AppSource, you need to be a Microsoft Partner with access to the Commercial Marketplace in Partner Center. Erik walks through creating a new offer step by step.
Creating the Offer
The first step is creating a new offer of type Dynamics 365 Business Central. You provide:
- Offer ID — The primary key for the app in Microsoft’s system (cannot be changed later)
- Offer alias — Used in emails and internal Partner Center displays
Offer Setup
- Package type — Choose “Add-on” for a true AL extension (vs. “Connect” for web service integrations)
- Listing option — “Get it now (Free)”, “Free trial” (functionally identical to free from a technical perspective), or “Contact me” (provides a private URL for customers)
- CRM/Lead management — Every download generates a lead. Options include Dynamics 365 CRM, Salesforce, Marketo, a custom HTTPS endpoint, or Azure Table Storage (which Erik uses)
Properties
- Category — Select from Microsoft’s predefined categories (e.g., Finance and Accounting)
- App version — Must match the version in your app file
- Legal terms / EULA — You need an End User License Agreement prepared
Marketplace Listing
This is what users actually see on AppSource. Filling this out comes with several pitfalls:
- Summary — A single sentence. Don’t use “Business Central” or “Dynamics” in the text, or Microsoft will reject it. The character limit is tight, so crafting the right message takes effort
- Description — Must include three mandatory sections: Supported Editions (Essential/Premium), Supported Countries, and Supported Languages. If these sections are missing, the app will be rejected — even though you also specify editions and countries elsewhere in the form
- Search keywords — Help users find your app
- Help link, privacy policy, and support URL — All required, pointing to publicly accessible pages
- Supporting documents — PDF files (no spaces in filenames!)
- Logo — Must be exactly 216×216 pixels in PNG format
- Screenshots — Minimum of 3, must be exactly 1280×720 pixels in PNG format, uploaded one at a time with captions
Availability
Select which countries/regions the app should be available in. Since this app works with the W1 base currency table and doesn’t touch localized accounting features, Erik made it available everywhere. However, he cautions: if your app touches localized features, don’t assume it works across all localizations just because it works in one.
Technical Configuration
- App file upload — The signed .app file. The version must match what’s in the Properties page
- Library extensions — Upload dependencies here if applicable
- Supported editions — Essential, Premium, or both
- Target release — Erik always selects “Current” to avoid complications
- Key usage scenario — The Word document describing the user scenario
- Test app — Marked as required (has an asterisk) but Erik notes that Microsoft does not actually use this for anything. You can upload any app file here
Supplemental Content and Co-sell
The co-sell section is optional and relates to co-selling with other Microsoft products. For a simple free app, this can be safely skipped.
Review and Publish
After filling out all sections, Partner Center shows a checklist confirming each section is complete:
- Offer setup ✓
- Properties ✓
- Offer listing ✓
- Availability ✓
- Technical configuration ✓
- Co-sell ✓
- Supplemental content ✓
Clicking Publish kicks off Microsoft’s automated validation pipeline, which includes:
- Automated application validation — Checks publisher name matching, object ranges, code analysis compliance, and more
- Lead management validation — Verifies the CRM/lead integration works
- Test drive provisioning — Various internal Microsoft processes
- Publisher sign-off — You get a chance to preview the listing on AppSource before it goes live
Summary
Getting an app onto AppSource involves far more than just writing AL code. The technical development is arguably the easy part — the bulk of the work lies in preparing all the surrounding assets: translations, signed builds, legal documents, marketing materials (logos, screenshots, descriptions), support pages, privacy policies, and navigating the Partner Center submission form with its various quirks and undocumented requirements. In Part 2 of this series, Erik will follow up on whether the submission succeeded or what needed to be fixed — because as he notes, something almost always fails on the first attempt.
