Connecting for the first time
From Business Central you can also run BCCL Request Builder (Alt-Q and search for BCCL) to get the first commands and the Request Builder Tool that can help you figure out what parameters to use and combine.
When BCCL is not returning data, all replies are returned as json to easier process the replies automatically.
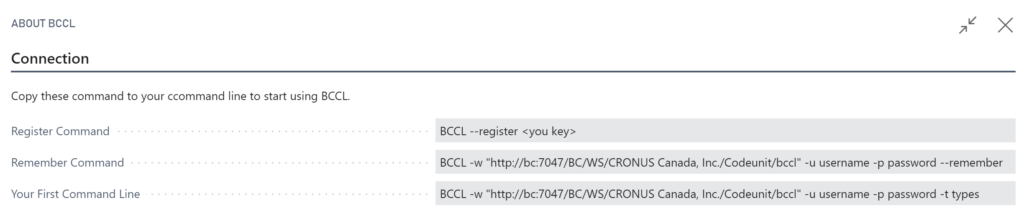
The URL for BCCL can be found in Business Central under Web Services. Locate the bccl web service and copy the Soap URL to your command-line:

If you’re using a cloud instance of BC you have to use OAuth authentication (–auth)
Installation and running BCCL as a service (On Windows Server)
If you want to use BCCL in Service Task mode, then you need BCCL installed as a service (it will run in a console for testing)
Copy BCCL.EXE to an empty folder and copy the bccl-install-service.cmd and bccl_service.example_s2s_auth files from the BCCL installation ZIP to the same folder.
Make sure you have a working Entra App registration created (See video above)
Now rename the bccl_service.example file to bccl_service.json and edit the fields so they match your Business Central
{
        "agentid": "MY_BCCL",
        "auth": "S2S",
        "clientid": "xxxxxxxxxxx",
        "tenantid": "xxxxxxxxxxxxxxxxxx",
        "clientsecret": "xxxxxxxxxxxxx",
        "url": "https://api.businesscentral.dynamics.com/v2.0/c1f19d2f-252e-4d89-a7c7-5bb9042d59eb/dev27/WS/CRONUS%20Canada%2C%20Inc./Codeunit/bccl",
        "defaultcompany": "CRONUS Canada, Inc.",
        "verbose": "true"
}
BCCL 3.23.0.344+2025-09-13
info: Microsoft.Hosting.Lifetime[0]
      Application started. Press Ctrl+C to shut down.
info: Microsoft.Hosting.Lifetime[0]
      Hosting environment: Production
info: Microsoft.Hosting.Lifetime[0]
      Content root path: C:\installedApps\BCCLasService
Now Service Agent should show up in Business Central:

You can stop BCCL in the console with Ctrl-C.
To install BCCL as a service, edit the bccl-install-service.cmd to reflect the folder where you have installed BCCL.
Run bccl-install-service.cmd and then go to Service Management to change Log On As to a user that has permissions to resources that BCCL need permissions to.
Upgrade from BCCL 2.x to BCCL 3.0
The BCCL 3.0 App in Business Central requires the BCCL 3.0 client (the exe file). The 3.0 client can work with the 2.0 app.
So the best approach to avoid interruptions is a two-step plan:
- Upgrade the client EXE from 2.0 to 3.0
- Upgrade the BC app from the “268” version to version 3.0